Picklists in TM1 are a great way for you to ensure that users only “enter” (or in this case select from a validated list) a value from a standard dropdown list of options. They are the equivalent of data validation in Excel and are dead easy to setup.

For example, you might want a user to enter a three character month like Jan, Feb, Mar etc. You could design your cube to have a text element and then ask users to enter periods in that format. This will work perfectly until someone enters “July” rather than “Jul”. If you then had Rules that are driven off those values, looking for “Jul”, rather than “July”, then you’re screwed!
The Solution for Dropdowns: Picklists!
To overcome this problem we use Pick lists, or dropdowns as some people call them. These allow us to define a standard list of possible selections, say Jan to Dec, and force the user to select from it.
Equivalent to Excel Data Validation
In Excel, you would typically use a Data Validation and enter or select the list for validation. In TM1, we do exactly the same thing with a picklist. Also, if you have used Data Validation in the past for a TM1 worksheet, you might like to consider changing them to use pick lists as these can be dynamic against your TM1 data, rather than static against an Excel list.
Normal Picklists
Methods of using Pick lists
There are a few methods to choose from to create dropdowns in TM1, namely:
- Static Picklist – hard coded values
- Dimension Picklist – all values from a dimension are available in the picklist
- Subset Picklist – only elements in a subset are available in the picklist
How to Create Picklists
The creation of a picklist is the same, no matter which method you choose. All are entries in an attribute on a specific element.
To create a standard picklist, create a new attribute literally called “Picklist” and then enter one of the following in the attribute against the relevant element:
Static Picklist
Create a list and then enter:
static:option1:option2:option3
For example: static:Jan:Feb:Mar
Dimension Picklist:
Define a dimension for use, say the Month dimension and then enter:
dimension:Dimension_Name
For example: dimension:Month
Subset Picklist:
Define a dimension for use and add a subset, say the Month dimension with an “nLevel” subset and then enter:
subset:Dimension_Name:Subset_Name
For example: subset:Month:nLevel
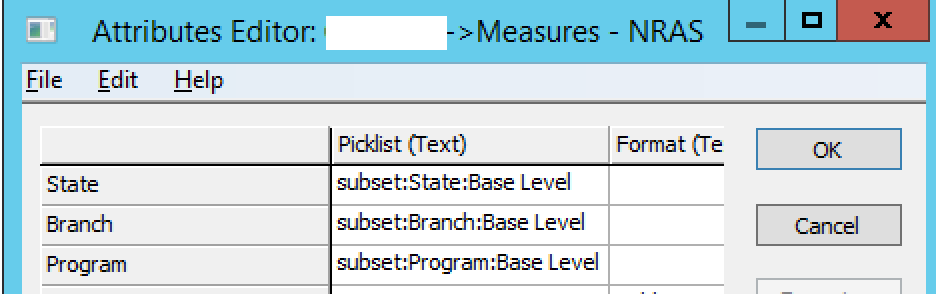
Example of a Picklist
Here is a series of pick lists against State, Branch and Program. Note the name of the attribute “Picklist” and then the syntax as type:dimension:subset, for example “subset:State:BaseLevel” (but exclude the inverted commas!):
Pick Lists on Attributes (using Control Cubes)
Method
Control cubes need to have a slightly different method done to them to make pick lists work against them.
The method involves the following:
- Create an attribute on the primary dimension and give it a name that means something (probably the name of the dimension you want to use as a picklist!).
- If you don’t have one already, create the dimension you want to use for the values in the picklist.
- Locate the Control Cube for the attributes of the primary dimension.
- Create a Picklist cube for this control cube.
- Locate the Picklist control cube created on the previous step.
- Create rules on the Picklist control cube.
- Edit the rules to define how you want the picklist to work. This is in the form [‘AttributeName’] = S: ‘subset:targetdimension:targetsubset’ ;
- Save the rules and you’re finished!
Example of a Picklist over a Control Cube
Take for example an “Account” dimension. Against that dimension we have a “Category” attribute defined that allows us to map from an account to a category. We also have a “Category” dimension, which lists the available categories. We want to use Category as a drop down, or pick list, in the Account dimension to limit the selection of categories in the accounts dimension to only those elements in the category dimension.
We want it to look like this:

To make this work we need to do the following:
- Create an attribute on the Account dimension called “Category”.
- Create a dimension called “Category” and a dynamic subset in it called “BaseLevel”, with all the level 0 elements.
- Locate the element attributes control (curly bracket) cube (not dimension) for the target dimension. So the control cube for the Account dimension will be “}ElementAttributes_Account”.
- Right click on this cube and choose Edit Pick List Cube. This will create the picklist cube if it doesn’t exist, or edit if it does and it will open.

- Locate the new pick list cube, in our example “}PickList_}ElementAttributes_Account”.
- Create Rules on this picklist cube.

- Enter a rule that is in the syntax:
['AttributeName'] = S: 'subset:targetdimension:targetsubset' ;
- So for our example, it will be:
['Category'] = S: 'subset:Category:BaseLevel' ;
- Save the rules and go back to the control cube and the pick list should be active.
Why would you use each method?
That’s easy. If it a list that will never change, like months of the year, just go with Static. If it might change and your are ok with all elements being available for selection, go with Dimension. If you want a limited group, use the Subset option.
If your list will be dynamic, use a Subset with MDX in it.
Further, if you want to display an Alias rather than the element ID in the pick list, then use a Subset and enable the Alias in the subset.
Use of Null (or Blank) Elements
In TM1 we can’t have an element that is blank. So how do we make a blank option available in a pick list?
Well for the static option, it’s easy. Just insert an additional : before the first option. So in our example above, we would enter “static::Jan:Feb:Mar”.
For dimension or subset based pick lists it is harder. Here we need to create an element with something like “—-” entered and then manage the use of it with downstream rules or TI statements.
Updating Picklist Dimensions
If your TI that updates the source dimension for your picklist deletes and recreates, rather than appends, you could run into data problems. Just be aware of it.
Security
Finally, make sure your users can see the dimension that is used for the pick list values! Otherwise (assuming they have rights to the cube) the report or view will display but the dropdown will not display.
IBM’s Notes on Picklists
Here is a link to IBM’s notes on picklists. I don’t think there is much added by them, but it can be useful to have the link for you anyway!


